

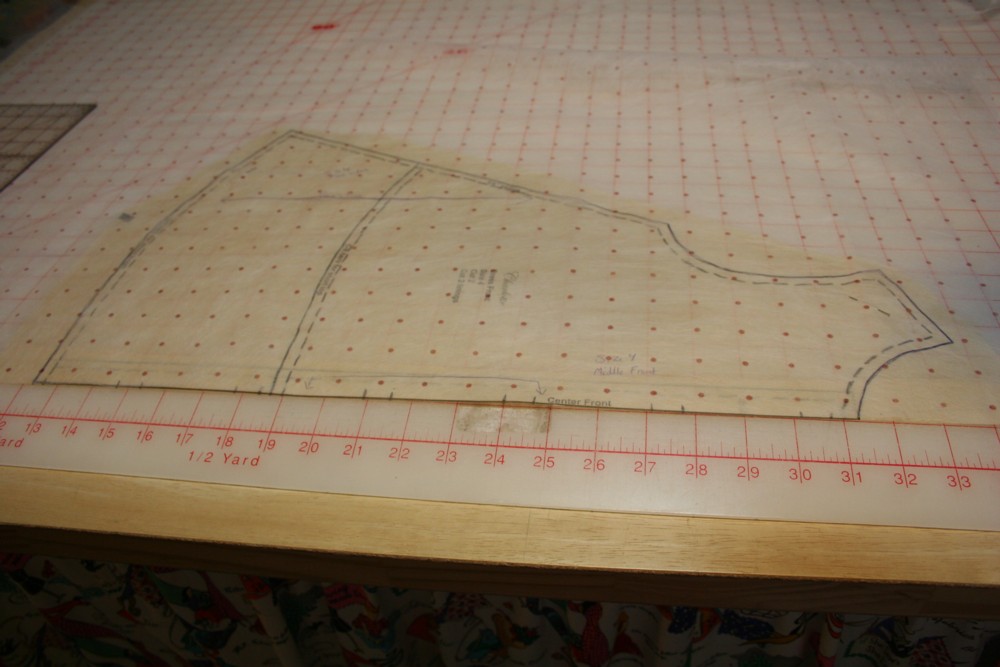
 Let's get started! First, you are going to trace off your front A-line pattern piece. In the picture here I am using a woven tracing material that doesn't show up in this picture very well, but it's actually laying on top of my pattern. After you have traced your pattern, line up your ruler to the center front fold line and draw a straight line on the far left side of your pattern piece that is parallel to the center front fold line.This line is going to be your new grain line, because you are about to split this pattern into two separate pieces.Also make sure you make a note on your pattern piece where you need to place on the fold line of your fabric.
 Next, you are going draw out your line for the triangle split. I just had to "eyeball" it. I really don't think you can mess it up.At the hem it's about half of the distance between the side seam and center front fold line. It's slightly less than half the distance on the neck .
 Once you have drawn your line to split the pattern I like to mark my new patterns with notes to add my seam allowances at the split. You could retrace your patterns out again with the added seam allowance but I just prefer to add it when I cut it out on my fabric.
 Here's the triangle cut out with the added seam allowance on the fold.
 Next you are going to cut your strips for the ruffles. Here, I have folded my fabric in half so that it is easier and faster to cut my strips. In my sample, I cut 3 strips sizes 3 1/2"x the 45" width of fabric.I used my serger to roll my hem but you might want to cut your strips a little wider(4" x width of fabric works well) if you are going to finish your edges with a rolled hem on your sewing machine.
At this time you should prepare all your ruffle strips by finishing with some kind of hem on one edge and gather the other raw edge. I like to use my serger to gather because it will finish the raw edge too, but if you do not have a serger, you will need to zig-zag your ruffled edge to keep it from fraying in the wash.
 I did not connect my strips because I did not want any seams in the middle of my dress ruffles.Starting at the bottom of your triangle measure up about 1 1/4" from the raw edge. This will give you an idea where it needs to fall. Then at the top of your ruffle tuck under 3/8" and do this to both sides.
 I did not connect my strips because I did not want any seams in the middle of my dress ruffles.Starting at the bottom of your triangle measure up about 1 1/4" from the raw edge. This will give you an idea where it needs to fall. Then at the top of your ruffle tuck under 3/8" and do this to both sides.
 Then flip over your ruffle r.s.t.(right sides together), this will give you an idea where you need to start pinning your ruffle in place. I will then use my seam gauge to help me line up the rest of my ruffle.3 1/2" worked for my project.

Here's a picture of what it will look like when pinned and ready to sew.Be generous at the edges of your ruffle piece. I like to trim it after I have sewn and pressed it in place.
 I sewed my ruffles down with a 3/8" seam.Flip your ruffle down and steam in place. Then trim the sides of your ruffle off.
 Next, decide where you want to position the next ruffle and once you decide, set your seam gauge to the measurement and pin the rest of the ruffle in place like you did the first one.For my sample dress,I positioned my next ruffle at 2" above the first ruffle, but your measurement might be a little different if your ruffle is larger or smaller than mine.Continue sewing your ruffle strips going up the triangle.I did not worry too much about where it would end up at the top. the first one I made, I continued my ruffles all the way to the top, but on this one I stopped it about 1" from the top. Both ways look fine to me.

After all my ruffles are finished, I like to stay stitch my ruffles in place down the sides so they stay in place when I sew them in the seam.

Now, take the other front side pieces and with r.s.t. sew one on both sides of your triangle.Now, I forgot to do it here in my picture, but you should add your sash in your seam at this point.Press seams.
 My neck edge turned out a little wonky so I trimmed my neck edge to round it out more but I kept my shoulder width the same because it still needs to match the back shoulder piece.
 Just so you can see that I make goofy mistakes too, I forgot to add my ribbon sash in the seam. No worries, I just opened up the seams where I wanted to insert the ribbon and resewed it in place.
 Lay out your front piece you just created on your lining material and cut. For the rest of the dress you will finish up by using the directions from your sewing pattern.

Here's a picture of what it will look like when pinned and ready to sew.Be generous at the edges of your ruffle piece. I like to trim it after I have sewn and pressed it in place.
 I sewed my ruffles down with a 3/8" seam.Flip your ruffle down and steam in place. Then trim the sides of your ruffle off.
 Next, decide where you want to position the next ruffle and once you decide, set your seam gauge to the measurement and pin the rest of the ruffle in place like you did the first one.For my sample dress,I positioned my next ruffle at 2" above the first ruffle, but your measurement might be a little different if your ruffle is larger or smaller than mine.Continue sewing your ruffle strips going up the triangle.I did not worry too much about where it would end up at the top. the first one I made, I continued my ruffles all the way to the top, but on this one I stopped it about 1" from the top. Both ways look fine to me.
After all my ruffles are finished, I like to stay stitch my ruffles in place down the sides so they stay in place when I sew them in the seam.

Now, take the other front side pieces and with r.s.t. sew one on both sides of your triangle.Now, I forgot to do it here in my picture, but you should add your sash in your seam at this point.Press seams.
 My neck edge turned out a little wonky so I trimmed my neck edge to round it out more but I kept my shoulder width the same because it still needs to match the back shoulder piece.
 Just so you can see that I make goofy mistakes too, I forgot to add my ribbon sash in the seam. No worries, I just opened up the seams where I wanted to insert the ribbon and resewed it in place.
 Lay out your front piece you just created on your lining material and cut. For the rest of the dress you will finish up by using the directions from your sewing pattern.
That's it! Let me know if you have any questions. I'd love to hear from anybody that makes one using my tutorial.Enjoy!
I almost forgot to mention yardage. Use the regular yardage requirements from your pattern for the main fabric,lining and triangle accent piece. If you refold your fabric and cut the triangle at the far edge, you will have plenty left over to cut your ruffle strips from the other side.For the two I made,size 3 and 4, I used 5/8 yard of the main fabric and 5/8 yard for the triangle and ruffle accent piece and 5/8 yard of lining.
I truly love this dress! The colors are really great together. The style is just different enough to make it so much fun!
ReplyDeleteAwesome tute. I love the dress too. A line and ruffles - cute as kittens!
ReplyDeleteI think the dress became fabulous! Beautifull. The fabric is so beautifully together! Really a dress that girls like te wear!!
ReplyDeleteNice weekend!
Groetjes, Collie
Thank you! This is definitely going on my list of things to try.
ReplyDeleteThis is adorable!!!!!! I love the fabric too!
ReplyDeleteThank you ladies! Can't wait to see what you all come up with!
ReplyDeleteI love the colors and the idea. I'm going to make one soon Thank you for the tutorial. Gita/Gigi
ReplyDeleteOh Ivey, I love this! The beauty of these little dresses is not only your innovative use of fabrics and colors, but the precious details like the ribbons & bows and the edging on the ruffles. Great tutorial, pictures always help. Thanks.
ReplyDeleteYou're so welcome Gigi and Julie!
ReplyDeleteSo adorable! Thanks for the tutorial! I so admire your designs!
ReplyDeleteLaura
Thank you Laura! I tried so hard today to leave a message on your blog but it would not let me. Boo! I just wanted to let you know I really liked your cute patterns.
ReplyDeleteExcellent tutorial for a lovely dressy look! Thank you!
ReplyDeleteThank you so much for sharing this tutorial with us. I just finished my first ruffle front dress using the CC Lucy pattern.
ReplyDeleteThank you for sharing..this tutorial makes it look so easy!
ReplyDeleteFound you on Flickr and WOW - these dresses are just beautiful! I'm putting this on my list of Sunday dress patterns to make. I bet it would look cute with sleeves to match the ruffles too (I need some more Fall patterns).
ReplyDeleteThank you ladies for all the sweet comments! Love the idea about adding sleeves to it! How cute would that be! I might have to try that too.
ReplyDeleteJust wanted to say thanks for the tutorial! I love the dress I made using it and linked back to you here.
ReplyDeletehttp://colescornerandcreations.blogspot.com/2010/12/babies-wedding-dresses.html
Great tutorial - found it from Cole's Corner.
ReplyDelete~Kimberlee
www.TheSpunkyDiva.com
Someone pinned thison pinterest.com and I LOVE it! I have some fabrics in mind already!
ReplyDeleteBEAUTIFUL!!!!
ReplyDeletewww.madebymami.com
This dress is beautiful...thank you for the tutorial, I might have to try this for my little girl, probably in some autumn fabrics.
ReplyDeleteGreat tutorial! I am going to list this in my Easter dress ropundup on my blog! Thanks for sharing I will link back! I just started following ! Kristy from www.apronsandapples.blogspot.com
ReplyDeleteOh my goodness! BEAUTIFUL! I'm adding to my Pinterest, and possibly posting on my blog.
ReplyDeleteOh wow!! I LOVE this. Thank you, thank you, thank you for sharing!!
ReplyDelete☺ Celeste
I adore this! I made my own version you can check out here:
ReplyDeletehttp://pinterest.com/pin/48765608435349937/
Thanks so very much! I'm using this to make ruffle curtains in my guest room! FUN!
Great tutorial and LOVE This dress!!! Beautiful! Thanks for sharing!
ReplyDeleteI found your dress tutorial on Pinterest recently & I plan to make one next week for our Daughter. I must confess that I have NEVER been a fan of the 'A-Line' but it was one of my 1st pattern purchases {due to recommendations of 'easy sewing'}. I've never used it...now I can't wait to! I ADORE Ruffles & I believe this will be a new 'favorite' in my home! THANK YOU! (=
ReplyDeleteOh wow!!! I haven't checked comments in like forever!!! Thank you all so much for the sweet and kind words. I was feeling poopie today but this definately lifted my spirits. I'm so happy to hear all of your plans to make this dress :-)
ReplyDeleteCoucou. tout simplement magnifique je le ferais bientôt le temps de trouver le tissu adequat thank you so much Bizbiz
ReplyDeleteGorgeous dress! Thanks so much for sharing. I am new at sewing. I do not like patterns but a simple A-line might not be too hard for me. I wish I could just measure my daughter and "EYE" an A-line cut-out. Any suggestions or should I just go buy an A-line dress? I don't like things so complicated. Thanks!
ReplyDeleteGorgeous dress! I also want to diy one beautiful a line dress
ReplyDeleteThis is EXACTLY what I have been looking for!!!! Thank you so much! Excellent tutorial!
ReplyDeleteThank you for sharing. Your tutorial is written so well and I appreciate the pictures that correspond. Looking forward to making this dress soon.
ReplyDeleteThe most adorable dress I have seen in awhile. Love the color combo and your tutorial is easy to follow. Do have a question? What about the back? Do you slip it over the head or is there a zipper. I have read the directions twice and I swear I don't see anything about how to finish it up to wear. Help? LOL
ReplyDelete40 year old in a senior body... I found the answer to your question in another tutorial iveyc95 did that will explain it all :) the link is below
ReplyDeletehappy sewing
http://iveyc95.blogspot.ca/2010/04/charlotte-tutorial.html
Thank you so much for sharing this beautiful design.. I am making my grand daughter this and she is going to love it <3
ReplyDeleteSorry meant to ask, in your dress, is it all cotton or is it a stretchy fabric??
ReplyDeleteJust wondering if the ruffles would lay the same for either fabric.
Thanks again
Just what I am looking for. Have some satin to make into into a dress for a 4yr old and the basic A-line will be perfect. Will add a godet into the centre back to for a slight train and should end up with a princess dress. Thanks for the idea.
ReplyDeleteLovely dress and I am going to try it for my grand daughter.
ReplyDeleteSo simple and so
ReplyDeletevery pretty!!
modèle super et simple...<3...<3...<3...
ReplyDeleteYour site well guideline i interested .Thanks for sharing great post. I really like this post.
ReplyDeletelong kurtis supplier
Thanks for sharing great post. I really like this post.
ReplyDeleteBest Collection of Wholesale Sarees in Surat and Wholesale Kurtis